 |
 |
 |
Schedule Preferences for Monitoring
Around the clock operation has become a minimal standard for online commerce and networked services. SiteScope is designed for monitoring system availability 24/7. There may be situations where you want SiteScope to change its monitoring and alerting behavior to match the schedules of certain operational groups or systems. SiteScope Schedules allow you to customize the operation of SiteScope monitors and alerts to fit special schedule requirements and preferences of your operation and organization.
This section describes:
- About SiteScope Schedules
- About Range Schedules
- About Absolute Schedules
- Using the Schedule Preferences Form
- Adding Additional Schedules
- Completing the Schedule Preferences Form for Range Schedules
- Completing the Schedule Preferences Form for Absolute Schedules
About SiteScope Schedules
By default, SiteScope monitors, alerts, and reports are enabled 24 hours a day, 7 days a week, 365 days a year. This means that as long as a monitor is enabled, it will be run according to the update frequency specified in the individual monitor configuration. For example, if a monitor is configured to run every 30 seconds, SiteScope will attempt to run the monitor every 30 seconds throughout the day. If SiteScope detects an error condition, any associated alert will be executed as well, regardless of the time of day.
Normally, 24/7 monitoring is required for adequate monitoring of systems that are required to be available around the clock. However, there may be a number of situations where it is useful to enable and disable certain SiteScope actions based on the schedules of the individuals or groups responsible for the servers and systems being monitored. You use Schedules to instruct SiteScope to enable or disable monitors according to time periods that you define.
Schedules are inactive until they are explicitly associated with monitor instances. You use the Advanced Options section of a monitor set up page to associate a schedule definition with a monitor.
Schedules are associated to alerts indirectly by way of the monitors associated with the alert. Any alerts associated with the monitors disabled by a schedule are effectively disabled for the period during which those monitors are disabled. However, if an alert is associated with other monitors that are not controlled by the same schedule, that alert will still be triggered if the other monitors report an error condition.
SiteScope has two types of schedules:
- Range Schedules
- Absolute Schedules
The following section describes these schedule types.
About Range Schedules
You can use Range Scheduling to specify a time range during which SiteScope will either enable or disable particular monitors. If you specify an enabled time range for a new monitor (using the Advanced Options on the Add monitor page), SiteScope will only run the monitor during that range. For example, if you create a range of 8am - 9pm, Monday through Friday, any monitors that have that range schedule associated with them will only be run during those times.
A common use of range scheduling is to set up different pager alerts associated with monitors running at times that to coincide with the work shifts when different administrators are on call. The schedule help prevent pager alerts being sent to individuals at an inappropriate time of day relative to the work schedule of that individual.
Note: You can enter multiple ranges by entering several start times and several end time separated by commas. For example to disable from 2-3am and 7-8am, you would enter 2:00,3:00 to 7:00,8:00
About Absolute Schedules
Absolute Scheduling lets you set specific times to trigger monitors to run. Generally, an absolute schedule will trigger a monitor to run only once at each time specified in the schedule. Absolute times are specified in a daily schedule. You may define multiple times for a monitor to run in a single day (for example, 6:00am, 12:00pm, and 6:00pm) by separating the times with a "," (comma). You may want to use this type of scheduling for monitors, such as the Link Checking monitor, which you want to only run once a day at a time when the server generally has a lighter load.
Using the Schedule Preferences Form
Use the Schedule Preferences page to view current schedules and gives you access to the forms used to create new schedules for your SiteScope monitors. The Schedule Preferences page includes a table of Schedules that lists the currently defined schedule names and type. As with other tables within SiteScope, the Schedules table includes links that allow you to Edit or Delete items from the table. The following is an example of the Schedule table showing several schedules.
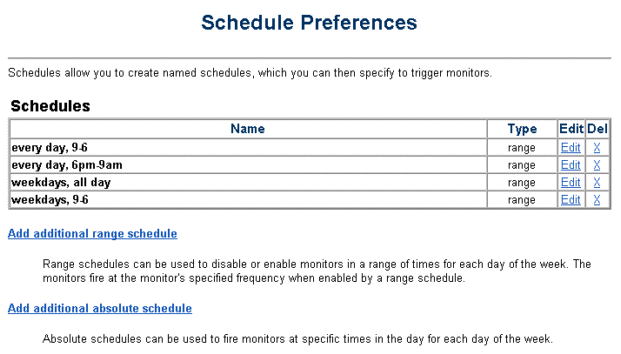
Below the Schedules table are links to the forms you can use to create custom schedules. The following sections describe the steps for creating additional schedules.
SiteScope schedule times are specified in the 24 hour format, also known as military format. This same syntax and format is used for both Range Schedules and Absolute Schedules. Examples of valid times entries are:
|
Schedule Entry |
Description |
|---|---|
|
10:23 |
10:23 AM, meaning 10:23 in the morning |
|
23 |
11:00 PM |
|
01,02:30,23:30 |
A multiple time entry including 1:00 AM, again at 2:30 AM, and again at 11:30 PM) |
|
00:00 |
12:00 AM or midnight |
As shown by the third example, multiple times can be entered on a single day by separating the times by commas.
Adding Additional Schedules
To create a new schedule choose the either the Add additional range schedule or Add additional absolute schedule links listed under the Schedules Table. The links bring up the Schedule Preferences page for the type of schedule you have selected.
Completing the Schedule Preferences Form for Range Schedules
This section describes how to create a new range schedule using the Schedule Preferences Form for Range Schedules screen. The following is an example of the Range Schedule preference page.
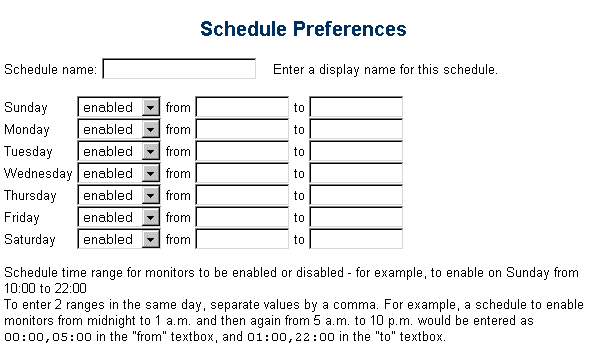
Range Schedules use a combination of a enable / disable setting and from and to time values to determine how SiteScope will schedule monitor runs. The following table presents several important examples for understanding, configuring, and using range schedules effectively.
|
Enable Setting |
Time Range |
Schedule Effect |
|
enable |
from and to time values specified |
Monitors will be enabled to run only during time range between the from time and to time. |
|
enable |
(no time values specified) |
Monitors will be enabled to run during all hours of the applicable day. This is the default setting for 24 hour operation. |
|
disable |
from and to time values specified |
Monitors will be ENABLED to run during all hours of the applicable day EXCEPT during time range between the from time and to time. During the time range specified the monitors will be DISABLED. |
|
disable |
(no time values specified) |
Monitors will be disabled during all hours of the applicable day. (It is important to note the difference between this disable method and the disable method where time values are specified.) |
Note: Time values for range schedules must be limited to the 24 hour period of a standard day for each day. For example, you might want to disable monitors from 6:00 PM on Thursday evening until 8:00 AM the following morning. Entering a from value of 18 and a to value of 8 on the Thursday schedule will be invalid because the to value is actually referring to a time on Friday. To create such a schedule, you need to enter time values from 18 to 24 for Thursday and then enter from 0 to 8 for Friday.
Use the following steps to add a new range schedule definition.
To add a new range schedule definition
- Click the Preferences button on the SiteScope main navigation menu. The General Preferences page is displayed.
- Click the Schedule link in the Preferences menu under the SiteScope main navigation links. The Schedule Preferences page is displayed.
- Click the Add additional range schedule link below the Schedules definition table. The Schedule Preferences Form for range schedules form is displayed.
- Enter a name to identify the new schedule into the Schedule name text box. You should use descriptive schedule names so that you will be able to easily identify them when associating schedules with monitors later. If you do not specify a name for a schedule, SiteScope will create one that describes the times specified.
- Use the drop down menu to the right of each week day to select if the schedule will be enabled or disabled for that day. See the guidelines in the table above for setting disable of enable options.
- Where applicable, enter a time range, using 24 hour format, in the from and to boxes to the right of the applicable week day. See the guidelines in the table above for setting time ranges for schedules.
- Click the Save Changes button to add the schedule.
Completing the Schedule Preferences Form for Absolute Schedules
This section describes how to create a new absolute schedule using the Schedule Preferences Form for Absolute Schedules screen. The following is an example of the Absolute Schedule preference page.
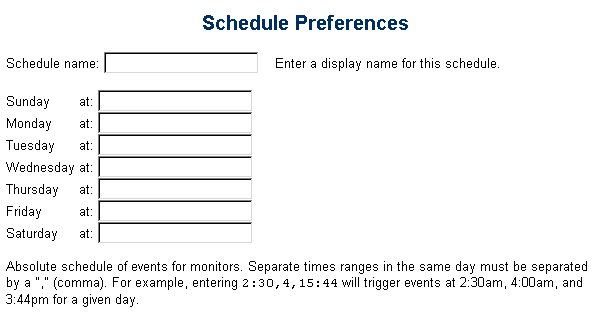
Absolute Schedules assume a condition of disabled unless one or more time values are specified. Therefore, any monitor associated with an absolute schedule will be disabled unless some time value has been entered for the applicable day.
Use the following steps to add a new absolute schedule definition.
To add a new absolute schedule definition
- Click the Preferences button on the SiteScope main navigation menu. The General Preferences page is displayed.
- Click the Schedule link in the Preferences menu under the SiteScope main navigation links. The Schedule Preferences page is displayed.
- Click the Add additional absolute schedule link below the Schedules definition table. The Schedule Preferences Form for absolute schedules form is displayed.
- Enter a name to identify the new schedule into the Schedule name text box. You should use descriptive schedule names so that you will be able to easily identify them when associating schedules with monitors later. If you do not specify a name for a schedule, SiteScope will create one that describes the times specified.
- Where applicable, enter one or more absolute time values, using 24 hour format, in the box to the right of the applicable week day. A time value indicates a time during the applicable day that you want to run a monitor. Separate multiple time values with commas.
- Click the Save Changes button to add the schedule.

Copyright © 2004 Mercury Interactive Corporation.
All rights reserved.
|
|
|