 |
 |
 |
Adding a Server to the Multi-view Server List
You use the Add to SiteScope Server List form to add or update connection information for remote SiteScope servers. SiteScope communicates with other remote SiteScopes via HTTP or optionally by HTTPS.
Use the following steps to complete the Add to SiteScope Server list form and add a remote SiteScope server to the SiteScope Multi-view Panel:
To add a SiteScope server to the Multi-view Server list
-
Choose the Edit Multi-view Panel link in the lower portion
of the Multi-view Panel. The Servers in Multi-view page is displayed.
- Choose the Add to Multi-view Panel link. The Add to SiteScope Server list is displayed.
- Enter the address of the remote SiteScope server in the Server Address box. For example, demo.sitescope.com:8888. Omit the http: prefix and any slashes.
- Enter an optional text description to be displayed for this server instance in the Multi-view panel.
- If access to the remote SiteScope server requires authentication, complete the additional options on the Add to SiteScope Server list form as described below.
- Press the Add to Multi-view Panel button to record the changes and update the SiteScoep server list.
The newly added server will be listed last in the server table and will appear on the Multi-view panel the next time the screen refreshes.
The Add to SiteScope Server List Form
To display the Add to SiteScope Server List Form, either click the Edit link for an existing Directory Monitor in the Multi-view Server List, or click the Add to the SiteScope server list link below the Server List table.
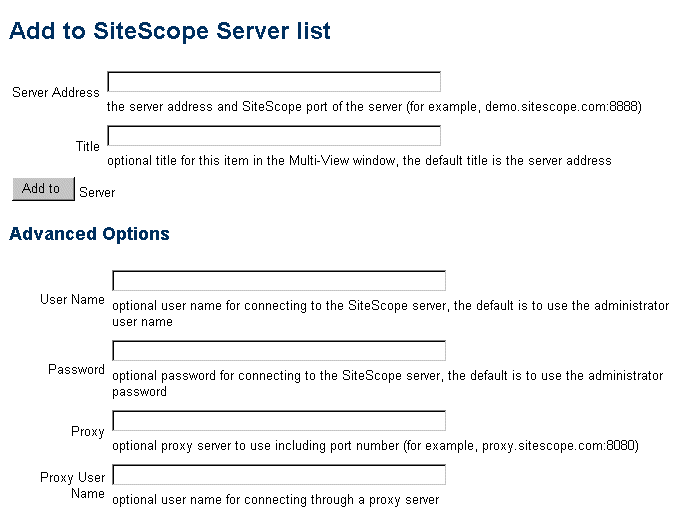
The following is an example of the Add to SiteScope Server List Form.

Complete the items on the Directory Monitor Form as follows. When the required items are complete, click the Add to Server button to complete the action
- Server Address
- the server address and SiteScope port of the server (for example,
demo.sitescope.com:8888)
- Title
- optional title for this item in the Multi-View window, the
default title is the server address
Advanced Options
The Advanced Options section includes a number of optional settings for specifying authentication for connecting to the remote SiteScope server.
- User Name
- If the remote SiteScope server is configured to require a user log in,
enter the user name for connecting to the SiteScope server. The
default is to use the administrator user name.
- Password
- If the remote SiteScope server is configured to require a user log in,
enter the user password for connecting to the SiteScope server.
- Proxy
- If you are using a proxy to connect to the remote SiteScope server,
enter the address of the proxy server to use including port number (for example,
proxy.sitescope.com:8080)
- Proxy User Name
- If connecting to the remote SiteScope using a proxy requires authentication,
enter the user name for connecting through the proxy server.
- Proxy Password
- If connecting to the remote SiteScope using a proxy requires authentication,
enter the user password for connecting through the proxy server.
- Timeout
- Enter a timeout value used for retrieving information from the SiteScope
server. If the Multi-view is unable to retrieve an update of the remote SiteScope
information within the timeout period, the request will be interrupted and a message
will be displayed for that server.
- Enable HTTPS
- If you are connecting to the remote SiteScope server using HTTPS,
check this box to enable HTTPS connectivity between this server and the remote
SiteScope server.
 |
 |
 |
